Interface
Web Interface
Overview of the web interface of OneOffice
Browser
You can connect to your OneOffice server using any Web browser. Just point it to your OneOffice server URL (e.g. app.OneOffice.ca) and enter your username and password.
For the best experience with the OneOffice web interface, we recommend that you use the latest version of a browser from this list (sorted from most standard-compliant):
- Google Chrome/Chromium
- Apple Safari
- Microsoft Edge
- Mozilla Firefox
Note: Using the latest version of your browser is even more critical if you plan on using OneOffice Talk or Webinar (video conferencing) as we leverage browser-capabilities for a smoother user experience.
Main Interface
By default, the OneOffice Web interface opens to your Files page. You can add, remove, and share files, and make changes based on the access privileges set by you (if you are administering the server) or by your server administrator.
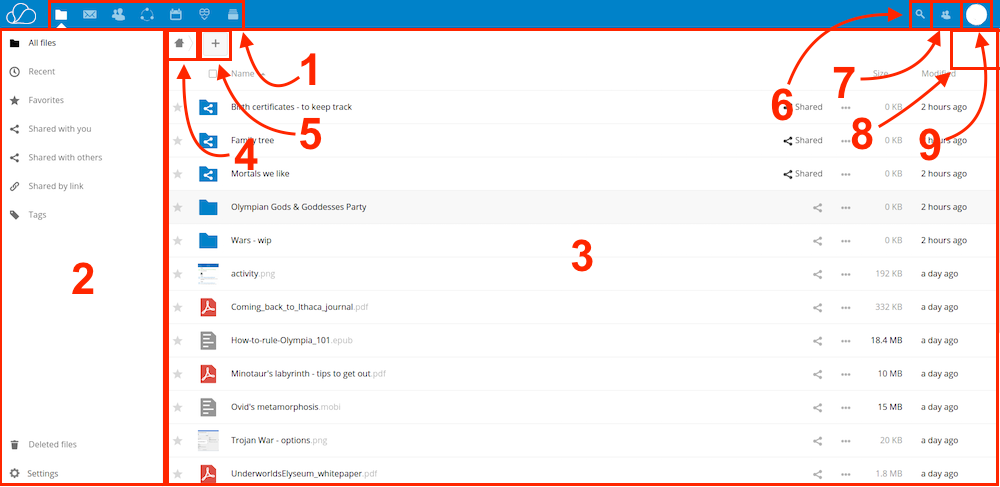
The OneOffice user interface contains the following fields and functions:
- Apps Selection Menu (1): Located in the upper left corner, you’ll find all your apps which are available on your instance of OneOffice. Clicking on an apps icon will redirect you to the app.
- Apps Information field (2): Located in the left sidebar, this provides filters and tasks associated with your selected app. For example, when you are using the Files apps you have a special set of filters for quickly finding your files, such as files that have been shared with you, and files that you have shared with others. You’ll see different items for other apps.
- Application View (3): The main central field in the OneOffice user interface. This field displays the contents or user features of your selected app.
- Navigation Bar (4): Located over the main viewing window (the Application View), this bar provides a type of breadcrumbs navigation that enables you to migrate to higher levels of the folder hierarchy up to the root level (home).
- New button (5): Located in the Navigation Bar, the New button enables you to create new files, new folders, or upload files. You can also drag and drop files from your file manager into the Files Application View to upload them to your instance.
- Search field (6): Click on the magnifier in the upper right hand corner of to search for files.
- Contacts Menu (7): Gives you an overview about your contacts and users on your server. Dependent on the given details and available apps, you can directly start a video call with them or send emails.
- Gallery button (8): This looks like four little squares, and takes you directly to your image gallery.
- Settings menu (9): Click on your profile picture, located to the right of the Search field, to open your Settings dropdown menu. Your Settings page provides the following settings and features:
- Password management
- Name, email, and profile picture settings
- Manage connected browsers and devices
- Group memberships
- Interface language settings
- Manage notifications
- Your Two-factor Settings
Have questions?
Still have questions? Talk to support.
All content copyright OneOffice / ZeGenie Inc. -- Unauthorized use is prohibited.